Average: 3 (2 Votes)
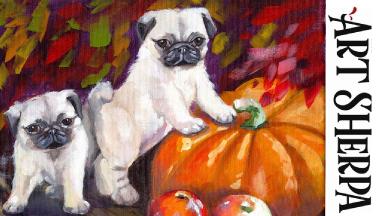
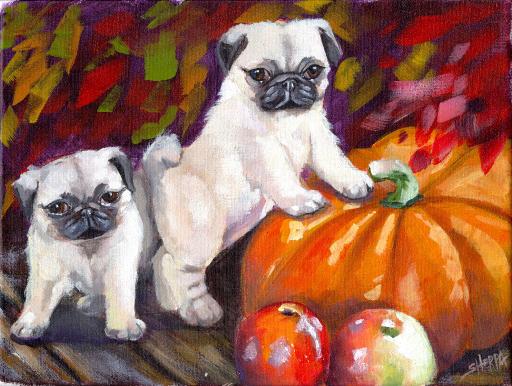
AUTUMN PUMPKIN AND PUGS Big art Quest Easy social paint night in you can enjoy from the comfort of your own home keeping it fun. This is a Painting course for Beginners who want a real acrylic painting step by step tutorial about how to paint . Everything is 100% real time, multi Camera angles and fully explained so its easy to understand. YOU CAN PAINT THIS !! All Art lessons are brought to you by The Art Sherpa You can join our Live stream chats daily to connect with other painters just like you.
Difficulty meter level in Hoots :
00:00 Intro
05:30 Step 1 Sketch in Image
15:00 Step 2 Background
21:33 Step 3 Blocking In
28:04 Step 4 Background Leaves
34:36 Step 5 Pumpkin
48:00 Step 6 Finish Pumpkin
1:02:26 Step 7 Apples
1:20:00 Step 8 Wooden Boards
1:36:13 Step 9 Sketch and Block in Pugs
1:57:26 Step10 Pug One
2:48:45 Step11 Pug Two
3:33:16 SIGN
✏️ Mini book, traceable, resources : RELEASE DATE
Chapters
Below are a list of RECOMMENDED MATERIALS.
The Art Sherpa is a participant in the Amazon Services LLC Associates Program, As an Amazon Associate I earn from qualifying purchases.
*** Acrylic Paint Colors ***
Cadmium Yellow Medium SENNELIER https://amzn.to/2J6nm3L
Naples Yellow light SENNELIER https://amzn.to/2J64yBB
❤️ Cadmium Red medium SENNELIER https://amzn.to/2Y6nhTS
❤️ Quinacridone Magenta SENNELIER https://amzn.to/2X1jBq2
Phthalo Blue Green shade SENNELIER https://amzn.to/2Xu7DV9
Ultramarine blue SENNELIER https://amzn.to/2XtrzaM
Phthalo Green Blue shade SENNELIER https://amzn.to/2FtciN7
Dioxazine Purple: SENNELIER https://amzn.to/2Xu7FfJ
Burnt Sienna SENNELIER https://amzn.to/39gJlzJ
☁️ Titanium white: SENNELIER https://amzn.to/2WZw91d
Mars black: PBk 11 SENNELIER https://amzn.to/2XxUqus
Naples Yellow Blog http://bit.ly/NaplesYellowLightTAS
.
CANVAS
9x12
Not a fan of Amazon ? My Teacher shopping list Dick Blick
https://www.dickblick.com/lists/blicku/0B4P6DL0JVY6D/publicview/
OTHER TOOLS
Sta-wet palette on show - https://amzn.to/3b5cd0L
Sta-wet Paper Refills - https://amzn.to/2MUGEz3
Sta-wet Sponge Refills - https://amzn.to/3dbHjH4
CretaColor Pencil White : https://amzn.to/3pqWlv5
T Square Ruler - https://amzn.to/38hjOWX
Golden Glazing Liquid For Blending - https://amzn.to/2M0ND8t
Saral Paper: http://amzn.to/2zBrLbN
Artist Tape : https://amzn.to/2qZTywt
The Pioneer Woman Turning Table : https://amzn.to/3nJ5pLw
Brushes -
Brushes: Please use these as a guide of what I am planning to use. These are brushes I use very often. You do not need to have the exact brand of brushes that I use.
Princeton Round Blender #12 : https://amzn.to/2ZiHibS
1” oval mop (The Art Sherpa Ultimate Varnish Brush) : https://amzn.to/3qpZlJn
Cambridge Bright #8 : https://bit.ly/3xme5g4
Ruby Satin Angle ½” : https://amzn.to/37fP76B
Monogram Liner : https://bit.ly/3gCetBb
The Art Sherpa Cats Tongue #8 bit.ly/MichaelsArtSherpaCatsTongue
The Art Sherpa Round #4 : http://bit.ly/MichealsArtSherpaRound
Ruby Satin Bright #20 https://amzn.to/3pp49xf
Hog round Round #6 - https://bit.ly/3xn3xgL
Ruby Satin Bright #26 https://amzn.to/3jXVjVZ
Ways To Patron and support us
Join this channel to get access to perks:
https://www.youtube.com/channel/UCy0-9vYn94d3i-_PZ3RJn2A/join
Patron : https://theartsherpa.com/patron
⭐️ Subscribe: http://bit.ly/TheArtSherpaSub
Check out my TopVideos! http://bit.ly/TheArtSherpaTopVideos
Check out my Upcoming Live streams http://bit.ly/UpcomingLiveStream
Follow The Art Sherpa
Website: https://theartsherpa.com/
Facebook: https://www.facebook.com/TheArtSherpa/
Instagram: https://www.instagram.com/theartsherpa
Pinterest: https://www.pinterest.com/cinnamoncooney/
Art Sherpa Merch : https://theartsherpa.com/store
#TheArtSherpa #AcrylicPainting
PLEASE note there are many other places to buy materials and I support you shopping and finding your best deal.
Please let me know if a link is broken. support@theartsherpa.com
About The Art Sherpa:
Artwork and video is the sole property of The Art Sherpa™ and intended for the students personal education and Enjoyment. For questions regarding using any Art Sherpa painting in a commercial setting contact us labs@theartsherpa.com for all other questions support@theartsherpa.com
Read our full disclosure here that covers partnerships and affiliate links http://bit.ly/affiliatedisclosureTAS
Tracing Method
Adjust the size to fit your surface and be sure to check your printer settings to see if the final size reflects the size you need.
Rub the back with graphite or use Saral paper and skip this step.
Be sure to rub the back of your paper on the side without the lines drawing using a HB pencil.
Hold up to window light to make sure graphite covers all the lines of the subject drawing.
Test your Seral paper to make sure the color you are using is going to show on the canvas.
Tape your paper on your surface to transfer with tape to keep it from moving. If you are using saral paper make sure you have both sheets taped down and the transfer side of the Saral paper will be facing your surface. Carefully, with medium pressure, redraw over every line. You can lift one corner of paper to see that your transfer is happening. If not, check if your rubbing is too thin or that your pressure is not too light. After you are done tracing the lines, remove your traceable and you should have a copy of the line art on your canvas.
Gridding Instructions
The gridding method allows you to dip your toe into drawing without being in the deep end of the drawing pool on day one. For our purposes, the gridding method has been worked out for you. In this example, is based on a one-inch square grid with everything of equal ratio. On your canvas, you will make a chalk line at the Halfway point horizontally and vertically. Then using your chalk tool and a T-square ruler at every 1 inch point both horizontally and vertically. The T-square will help ensure that your lines are straight.
To draw the grid your canvas must be dry and it’s advisable that it is also cool. You should use chalk that is wax or oil free. It must be pure chalk. I use a Dritz fabric-marking tool because it does fine lines easily and removes well from the canvas. There are also chalk pencils available or you could use chalkboard chalk. While I will always share with you the tools and equipment that I am using, you are welcome to deviate from that any time you feel something else is best for you.
Something that I have learned especially with complex images is that it can be easy to get lost in the grid. If you find yourself unsure, go back and check to make sure that the square you are marking on matches the square in your reference. After you master this method, you will be able to use gridding to transfer any image from a reference to your canvas.
Number your columns 1 - X, left to right, and your rows 1 - X ( X is the length) from the top to the bottom.
Find the first row that the contour line of your image enters and exits and duplicate only what you see in that one single square. Continue through the entire image square by square transferring, the contour lines of the subject with chalk on your canvas. When you have duplicated the subject from your reference to your canvas, you will be done.
You can remove chalk easily by taking a soft brush and getting it damp with clean water. Gently brush over the lines you wish to remove and they will lift.
If you prefer a different size there are many great resources out there that involve math about how to scale. I do not teach math for many good reasons and I could count them all for you, but that would be doing math. The resources out there for that information and those mathematical formulas exist online in copious amounts. Explained beautifully and if you are choosing to paint different sizes than we are utilizing in this mini book, I highly recommend finding one of those formulas and mastering it. Short of that, buy a canvas to match the free grid for this project.

